Let’s Start Fresh with a Reset!
Filters in Tableau allow users to drill down to the data of interest. While this option makes data exploration fun, resetting multiple filters back to ‘All’ one-by-one can be time-consuming, primarily if numerous filters exist. A Reset button that with one click resets all filters and sets to “All” (meaning all values are included again) will improve the user experience and save time while exploring the dashboard features.
Note: For the purposes of this blog post, I will use the term ‘Reset Filter’ which will mean a button that resets filters and sets to bring in all values and clears previous user selections. You are welcome to name the filter something that is easily understood by your users.
If you’ve followed along with my recent blog series, this is the last step to improve the user experience when using parent and child cascading filters. To review, the primary filter, the parent, is used to affect the filter options that are displayed in a secondary filter, the child. A common issue that occurs when the child filter selection no longer corresponds with the parent filter and the dashboard data becomes unavailable, the user must select a corresponding child filter or set the filter back to all. Creating a Reset button allows the user to reset the view and continue exploration of the data quickly.
Let’s review our real example of the JSI Workforce Well-being Survey. When a user selects a parent filter such as Age and a child filter that is the age group’ 40 and Older,’ then switches the parent filter to ‘Race/Ethnicity,’ the child filter no longer corresponds to the parent filter. The data in the dashboard becomes unavailable, and an error message prompts the user to adjust the filter or click on the Reset button to reset the view.
How to Create a Reset Button
Reset buttons can reset all filters and sets in a dashboard, returning the user to the original view. Below I’ve outlined the steps to create a reset button in Tableau.
Step 1 – Create the Worksheet for the Reset Button
- To create the Reset button, open a new worksheet.
- Double-click in the rows shelf to view a text box. Within quotations, type the text you’d like displayed as the button. For our example, I used “Reset Filters.”
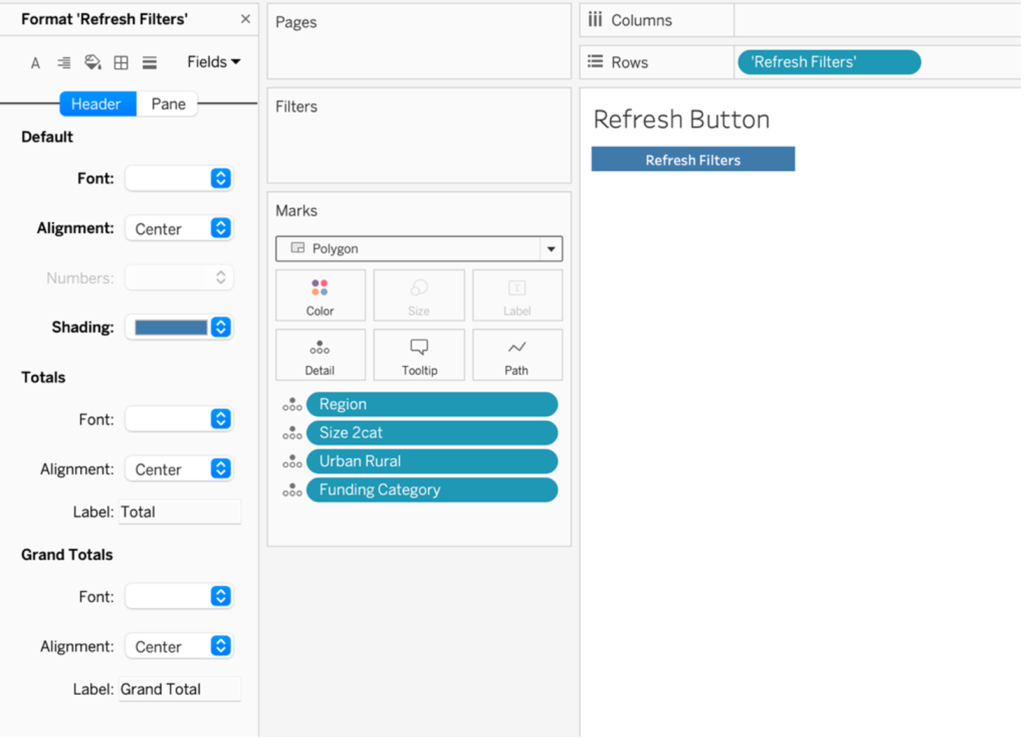
- When using sets, place the dimension field of the set on Details in the Marks Card. This will allow the filter action to reset the set.
- In the Marks Card, change the Automatic Mark type to Polygon. This mark type does not require the display of the details in the view.
- Formatting the text of the Reset button as a hyperlink will invite the user to click on the button. Format the text to be underlined and blue.
![Image of a Tableau worksheet displaying how to create the reset button.]](https://healthdataviz.com/wp-content/uploads/2024/07/Refresh-Button-Fig.-3-1024x801.png)
Design Tip: You can choose to add more design aspects to the reset button. Here are some examples of how to further design a reset button.
If using sets in your dashboard where it is necessary to have the dimension of the set placed on the Marks Card, continuing to use a Polygon Mark type and then formatting it to have shading can enhance the design of a button.
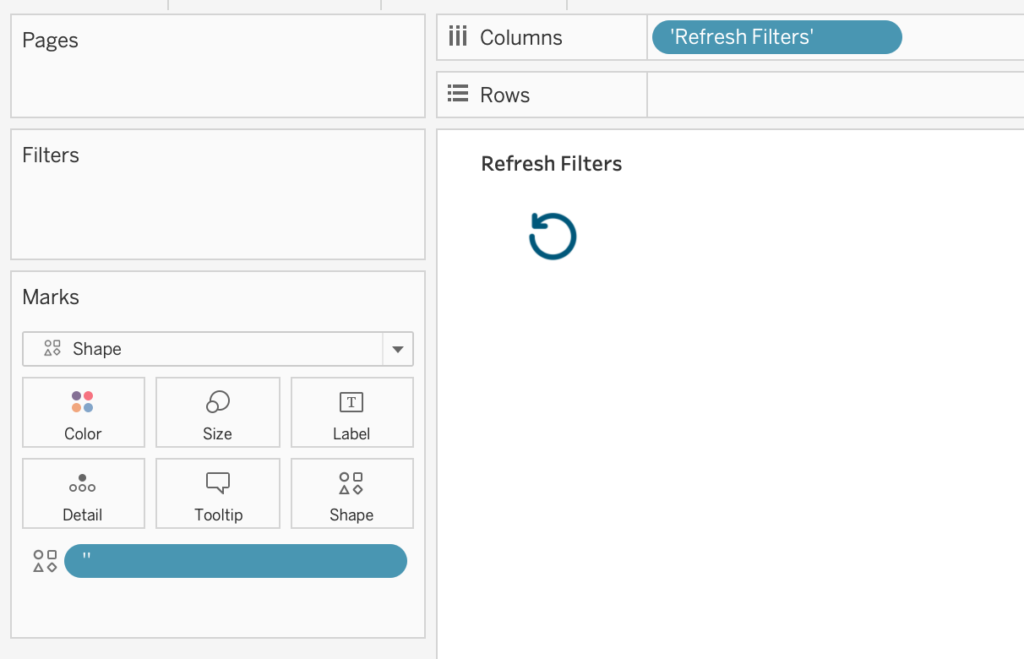
If you are created a reset button for only filters, which does not require displaying any fields on the Marks Card, utilizing a custom shape can be a great way to enhance the button.
Steps to Create a Custom Shape Reset Button – Resetting Filters Only
- Save an icon of what you’d like to use as your reset button on your computer: Documents > Tableau Repository > Shapes > Create a new folder ‘My Shapes’ (or whatever name you’d prefer)
- Double-click on the blank space at the bottom of the Marks Card to open a text box and enter two quotations. Hit Enter.
- In the Marks Card, click the drop-down caret next to ‘Automatic’ and select ‘Shape.’
- Drag the double quotation field onto the ‘Shape’ tile in the Marks Card.
- Click on the ‘Shape’ tile to edit the shape.
- Click the drop-down next to ‘Default’ and locate the new folder you created where you’ve saved your desired reset button icon. If you do not see the folder of the icon in the folder, click the button ‘Reload Shapes.’
- Select the imported icon and click ‘Okay.’
- You can choose to leave the shape as is, or you can add a title to it to help the user understand it’s functionality.
- Double-click in the space of the columns shelf to reveal a text box. Type in quotations the title you’d like to give your reset icon.
- Remove your field header for your columns and any unwanted columns or row lines.
Go to your dashboard and place the Reset button in a prominent area easily visible to a user, such as the top right- or left-hand corner. A location at the top of the dashboard or near the filters ensures your users won’t miss it.
Creating filter actions will connect the Reset button to the filters, allowing the Reset button to reset the filters back to ‘All.’ If your dashboard utilizes set filters, the steps to create set actions are in Step 3.
Step 2 – Create the Filter Action(s) for the Reset Button
- On the menu bar, click on Dashboard > Actions.
- In the menu, Add Action, select ‘Filter’
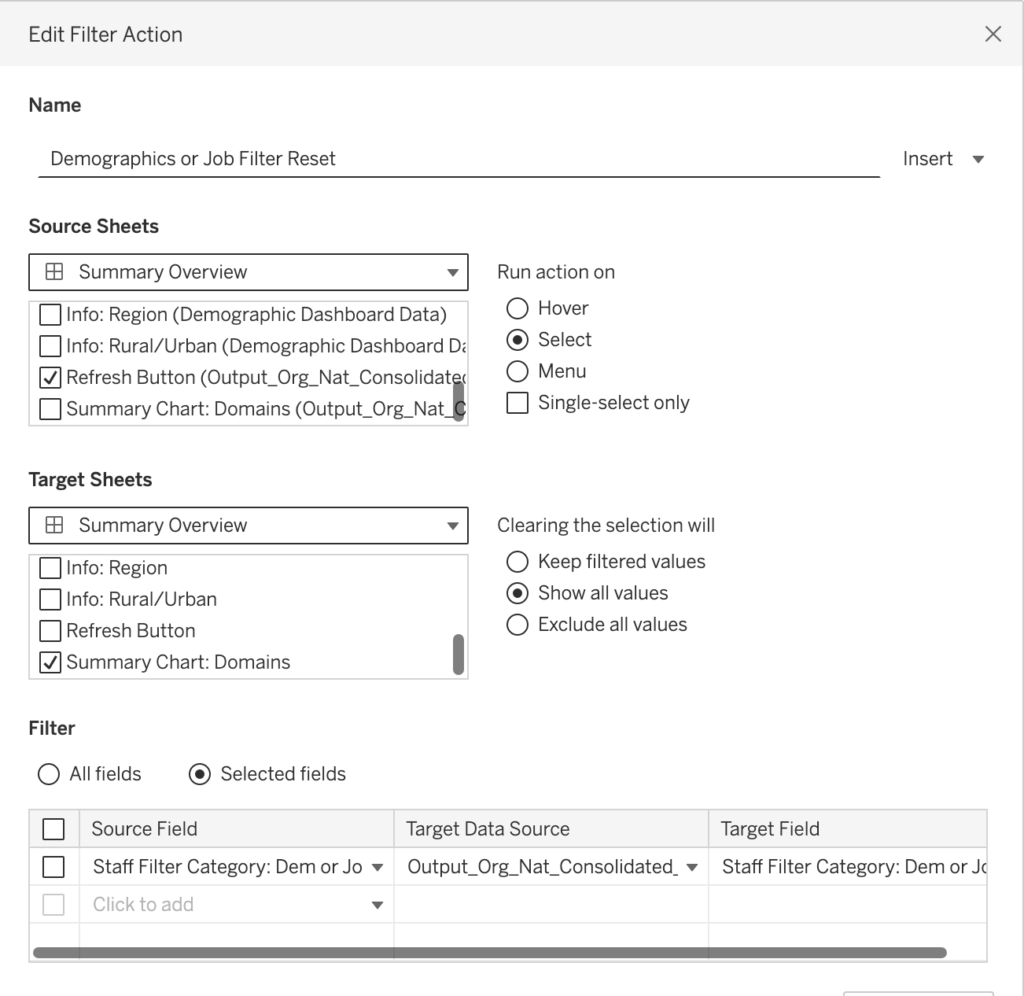
- In the Filter Action dialogue box, choose the following:
- Rename the Edit Filter Action
- Source Sheet: Select the Reset button worksheet.
- Run action on: Select
- Target Sheets: Select all worksheets with the data visualizations.
- If you’ve followed along the other blog posts to this series and created a dynamic blank worksheet to hide and reveal the error message when the parent and child filters do not correspond, make sure to select the worksheet ‘Dynamic Blank.’ This ensures that when the reset button clears the filters and sets, that the error message goes back to being hidden. If you missed this blog post and want to learn how to create a dynamic error message, visit this link.
- Clearing the selection will: Show all values.
- Filter > Selected Fields > Choose the filter field.
- Repeat these steps for any additional filters in the dashboard you’d like affected by the Reset button.
Step 3 – Create the Set Action(s) for the Reset Button
- On the menu bar, click on Dashboard > Actions
- In the menu, Add Action, select ‘Change Set Values.’
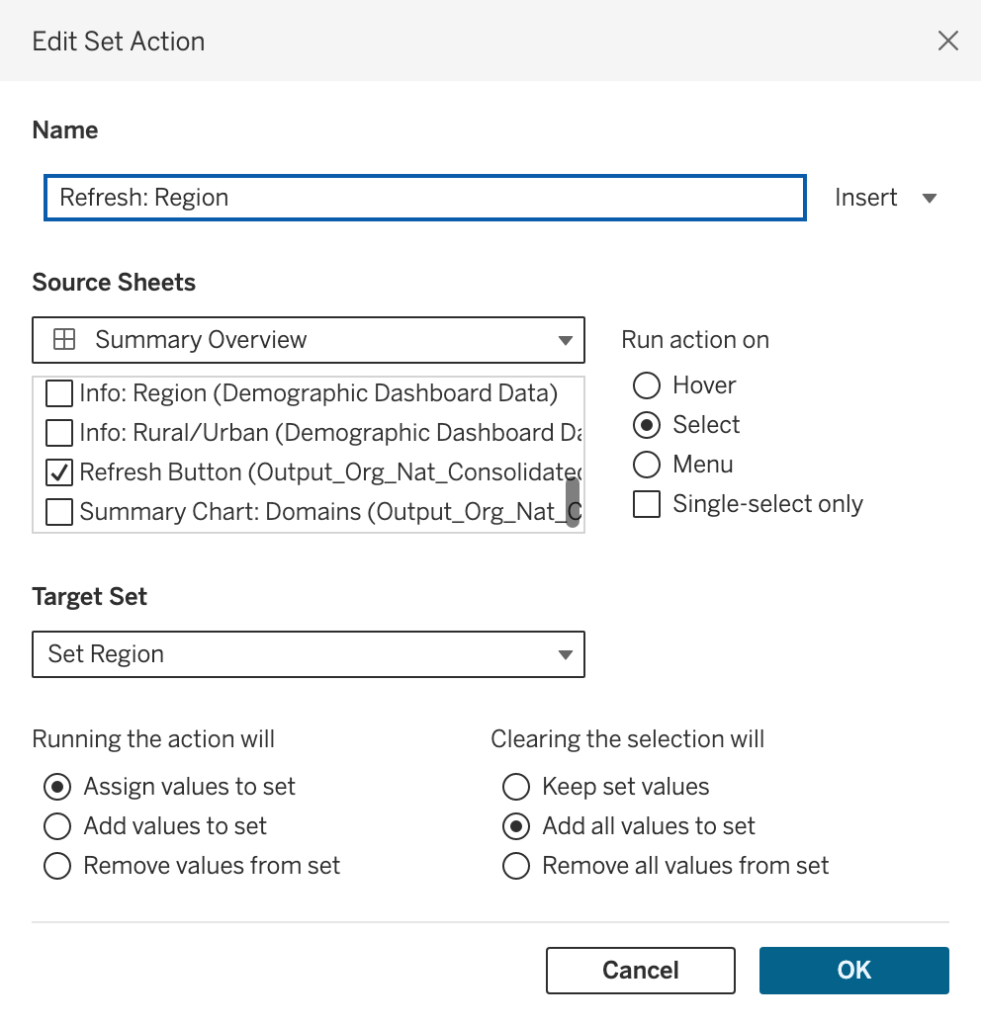
- In the Edit Set Action dialogue box, choose the following:
- Rename the Set Action
- Source Sheet: Select the Reset button worksheet.
- Run action on: Select
- Target Set: Select the set field from the data source
- Running the action will: Assign values to the set
- Clearing the selection will: Add all values to the set
- Repeat these steps for any additional sets in the dashboard you’d like affected by the Reset button.
Test out the Reset button by selecting filter options. Click the Reset button to see if it reset the filter to ‘All.’ If you’re testing a dashboard where the data blanks out when a parent and child filter do not correspond, clicking the Reset button should reset the filters to ‘All’ and reveal the dashboard data.
Want More?
There you have it! This concludes the series on how to improve the user experience when using parent and child cascading filters and multiple filter options on a dashboard. Want to learn more about the previous blog posts of this series? Follow the links below: